
“Could one material really transform a bedroom from ordinary to effortlessly refined?” If you’re weighing up your options, microcement earns its place with a seamless, hotel‑calibre finish, rapid installation, and low‑maintenance durability that suits modern UK homes. In this guide, I’ll share clear, practical planning advice – where to use it for the biggest impact, how to choose colours and textures that enhance calm, and ways to optimise comfort, acoustics and warmth.
Read more: https://festfloor.com/pages/microcement-in-the-bathroom
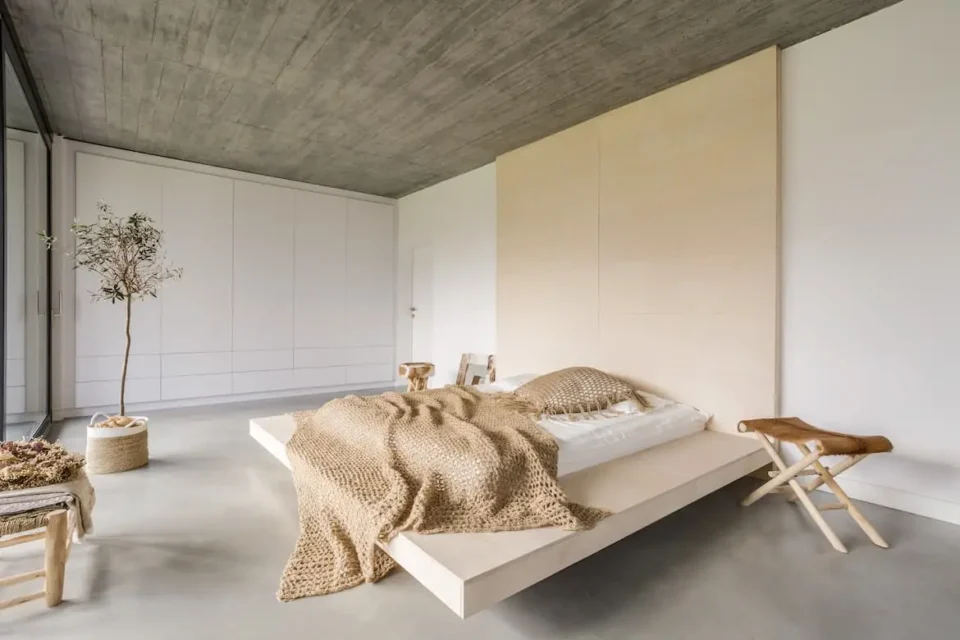
Plan the Bedroom Surfaces First: Where Microcement Adds the Most
Forget scatter‑gun decorating. Start by mapping where microcement will deliver the biggest visual win and daily-life payoff. Target high-impact zones: a feature wall behind the bed for that boutique-hotel vibe, a seamless microcement floor that makes the room feel bigger, sleek wardrobe fronts for a calm, built-in look, crisp window reveals to sharpen natural light, and a sculpted built-in headboard that hides cables and doubles as a shelf. Then audit what you’re coating: plaster, plasterboard, MDF, old tiles, or concrete. Note any cracks, flex, or damp. Decide your goals up front – seamless finishes, easy cleaning, more light bounce, and that hotel feel – and match them to the right zones. Be blunt about risks: moisture near en‑suite doors, movement on timber floors, and condensation on cold external walls. That’s how you get a bedroom that looks curated, not cobbled together.
Use a quick, no-nonsense checklist to keep the install tight and future‑proof. If something fails, it’s usually because the prep was lazy, not because microcement can’t hack it.
- Room size: confirms batch consistency and trowel pattern planning for a truly seamless look.
- Substrate type: plaster/plasterboard need priming; MDF edges must be sealed; old tiles require degreasing and keying; concrete needs moisture checks.
- Humidity readings: verify with a meter; high levels demand a vapour‑open primer or improved ventilation.
- Movement joints: essential over timber floors or large spans to prevent hairline cracking.
- Risk zones: plan extra sealing near the en‑suite, add thermal lining or an anti‑condensation base on cold walls.
- Calm headboard wall + skirting: Wrap the bed wall and low skirting in a soft mineral tone. Result: hotel‑grade minimalism, cables hidden in a microcemented channel, dusting takes seconds.
- Full wrap floor‑to‑wall in dressing nook: Take the microcement floor up the wall 300–600 mm. Result: a luxe seamless finish that visually enlarges the space, zero grout lines, and a wipe‑clean grooming zone.
Design the Look: Colours, Textures and Bedroom‑Ready Ideas
Microcement bedrooms thrive on a tight, curated palette that feels intentional, not chaotic. Lock in 3–5 tones max: think warm greys, clay, greige, soft blush and a grounding deep ink. Choose one hero colour and two supporting shades so the space reads calm but layered. For finish, go ultra‑matt on walls for that cocooning, glare‑free vibe; use satin on touch‑heavy or wipeable zones (behind bedside tables, around switches). Keep the trowel work light and natural – subtle movement, no heavy swirls – so the surface stays elegant, not shouty. Below are three tight, bedroom‑ready schemes, each with clear material direction, feature ideas and a mini mood board structure you can brief in minutes.
Scandinavian Calm: hero a pale greige microcement wall, pair with oak bedside, relaxed linen and crisp black accents. Add a microcement headboard with integrated shelf to keep the floor clear, run shadow gaps at skirting for a floating effect, and wrap wardrobes to unify volumes. Mood board: greige wall swatch, oak + black metal swatches, one lifestyle photo with soft linen, one close‑up of fine trowel texture. Boutique Hotel: carve a deep taupe headboard niche in microcement, layer brass details, velvet bedding and warm lamps for glow. Add a microcement window bench as a reading perch; use satin around the niche for easy wipe‑downs. Mood board: taupe swatch, brass and velvet swatches, lifestyle night‑scene, close‑up of satin sheen. Soft Industrial: lay a warm grey microcement floor, balance with putty‑toned walls, tactile bouclé and smoked oak. Keep junctions crisp with shadow gaps; wrap the wardrobe and bench seat to merge planes. Mood board: warm grey floor swatch, putty wall, bouclé + smoked oak swatches, lifestyle photo of calm industrial bedroom, close‑up of feathered edge.
| Scheme | Hero & Support Colours | Finish & Texture | Key Features | Best For |
| Scandinavian Calm | Pale greige (hero), warm grey, soft blush | Ultra‑matt walls, fine trowel movement (≈0.3–0.5 mm) | Headboard with shelf, shadow gaps, wrapped wardrobes | North‑light rooms needing warmth and serenity |
| Boutique Hotel | Deep taupe (hero), clay, greige | Satin niche for wipeability, soft movement (≈0.5–0.8 mm) | Headboard niche, brass accents, window bench | Evening loungers who want glow and tactility |
| Soft Industrial | Warm grey (hero), putty, deep ink accents | Ultra‑matt walls + sealed floor, light feathering | Wrapped wardrobes, shadow gaps, integrated bench | Open‑plan or loft‑style bedrooms wanting cohesion |
Comfort and Wellbeing: Quiet, Clean and Warm
Microcement bedroom finishes deliver a tactile win: an ultra-smooth, jointless surface that feels calm underfoot and wipes clean in seconds. No grout lines means less dust hangout – ideal for allergy-conscious bedrooms and anyone fed up with high‑maintenance floors. Pair with low-VOC primers and sealers and you’ll keep indoor air quality on point; once cured, odours fade fast, so you can get the room back in use without that chemical fug. Worried about echo from a hard surface? Balance it with heavy curtains, upholstered seating, and a padded headboard to soften acoustics and keep the space hush‑quiet. For comfort, this finish plays nicely with underfloor heating, while wool runners or area rugs add plushness where you plant your feet in the morning. Add safety details too: specify a slip‑resistant sealer at en‑suite thresholds and use soft roundovers on exposed edges for a refined, toe‑friendly profile.
Case study – North‑facing retreat: A compact London bedroom struggled with cool light and dusty carpets. We installed a jointless microcement floor over electric UFH, sealed with a low‑VOC matt finish. The client chose warmer hues – greige with a hint of clay – to counter the blue daylight, then layered warm LED lighting (dim-to-warm lamps, bedside sconces) to keep evenings cosy. Acoustic softness came from linen blackout curtains and a tufted headboard, which killed the slap‑echo without compromising the clean look. A textured, slip‑resistant topcoat at the bathroom threshold handled wet feet, and subtle edge roundovers made the transition feel crafted, not clinical.
Micro‑tip: If the room faces north, choose warmer microcement tones (sand, oat, clay) and build in layered lighting – ceiling wash, bedside task, and low‑level night lights – to offset cool daylight while keeping that clean, minimalist bedroom vibe.
Check out the microcement: Microcement for floor
Fast, Low‑Profile Installation That Minimises Disruption
Want a fresh, modern surface without ripping your space apart? A professional microcement system goes down at a slim 2–3 mm, so doors usually don’t need trimming and skirtings can stay put. Most projects wrap in 3–5 days, meaning you’re not living on a building site. The workflow is clean and logical: prep/prime → base coats → colour coats → sealer → cure. Here’s the one‑look timeline pros actually use: Day 1 – protection, substrate repairs, priming; Day 2–3 – base and colour coats with dust‑controlled sanding; Day 4 – two-coat sealing for stain and wear resistance; Day 5+ – light use, with full cure typically in 5–7 days. Keep things smooth by covering furniture, using proper extraction, and holding a steady 18–22°C with stable humidity for a flawless finish and reliable bond strength.
Case Study: Minimal‑mess upgrade on a tight schedule. The client wanted a seamless, low‑profile finish without replacing flooring or fussing with thresholds. We protected soft furnishings, sealed off adjacent rooms, and set up dust control. The substrate was patched and primed on Day 1; two microcement base coats plus two tinted colour coats went in on Days 2–3 with light sanding between. Day 4 was all about the high‑performance sealer (two coats, specified for stain resistance and easy maintenance). By Day 5, the space was usable; by Day 7, it was at full hardness. Result: seamless aesthetics, no bulky build‑up, and near‑zero disruption. Before/After (same angle): Before – tired laminate with visible joints; After – continuous microcement surface with refined movement. Step labels: 1) Protect & Prime, 2) Base Coats, 3) Colour Coats, 4) Seal x2, 5) Cure.
Durable, Low‑Maintenance Living (Without the Fuss)
Expect real-world resilience without the drama: this finish shrugs off everyday scuffs and, when properly sealed, stays water-resistant enough for spills, morning coffee mishaps, and over-enthusiastic houseplants. Keep upkeep simple: use a pH‑neutral cleaner and a soft microfibre mop, skip bleach and abrasives, and stick felt pads under furniture so heavy pieces glide instead of gouge. Want long-game protection? Re‑seal high‑touch zones every 2–5 years (follow your chosen brand’s guidance) to refresh sheen and keep moisture at bay. Tiny knock or chip? Spot‑fix with a colour‑matched repair kit, feather the edges, then re‑seal the area – clean, quick, and far cheaper than ripping anything out.
- Versus paint: a tougher, wipeable texture that won’t mark every time a hanger grazes the wall.
- Versus carpet: hypoallergenic, dust doesn’t cling, and it’s easier to clean in minutes – not hours.
- Versus laminate: seamless look with custom colour options, no ugly joints telegraphing across the room.
Do/Don’t quick hits: do lift heavy furniture, don’t drag it; do wipe spills promptly, don’t soak surfaces; do use door mats to catch grit, don’t use scouring pads. Keep it simple, keep it sharp, and enjoy durable, low‑maintenance living without turning your weekend into a cleaning shift.
Smart Budgeting and Long‑Term Value (UK‑Focused)
Budget with real‑world UK figures and a cool head: for walls expect roughly £80–£150 per m² depending on prep and finish; for floors plan around £100–£180 per m², with timber substrates needing extra prep. Factor in extras like crack‑bridging mesh, moisture barriers and custom colour. Hire a pro for large areas, complex substrates and integrated details such as niches or wardrobes – that’s where experience saves you from costly do‑overs. The quiet wins stack up: minimal rip‑out, ultra‑thin build‑up, a faster programme, and fewer trades on site. The payoff is a timeless look that photographs well for resale, plus durability and low maintenance that keeps costs predictable. If a quote looks suspiciously low, it probably skips proper substrate prep or sealing – both non‑negotiable for longevity and stain resistance.
Compact cost example (guide only) – use it to sanity‑check quotes, not as a substitute for a survey:
| Area | Size | Assumptions | Estimated Cost |
| Feature wall | 10 m² | mid‑prep, ultra‑matt | £1,000–£1,300 |
| Dressing nook walls | 6 m² | light prep, satin | £480–£900 |
| Floor (engineered timber subfloor) | 12 m² | decoupling + mesh | £1,400–£2,100 |
| Total (example) | 28 m² | includes sealing | £2,880–£4,300 |
Practical playbook: lock in site survey and a written breakdown covering prep, coats, sealers and curing. Ask for the system datasheet, confirm moisture readings on subfloors, and agree on sheen level and colour sample signed off under your lighting. For timber, insist on decoupling and mesh; for concrete, check moisture barriers. Push for a realistic programme including curing time before furniture goes back. That’s how you get long‑term value without drama – and a finish that looks expensive without nuking the budget.